Easy Homemade Recipe for Peking Duck – Crispy & Restaurant-Style
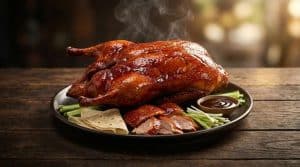
Craving crispy restaurant-style duck at home? This recipe for peking duck reveals 7 easy secrets for juicy meat and perfect crispy skin. cook today
Type: Chinese
Cuisine: Chinese
Keywords: recipe for peking duck, how do you cook peking duck, pekin duck recipe, peking duck recioe, recipe peking duck, crispy, juicy, homemade, restaurant-style, quick, easy
Recipe Yield: 4 servings
Calories: 485 calories
Preparation Time: PT1H
Cooking Time: PT1H20M
Total Time: Main Course
Recipe Video Name: Recipe for Peking Duck – Preparation
Recipe Video Description: Quick 8-second prep: clean duck, apply glaze, season with spices. Easy homemade steps for crispy skin.
Recipe Video Thumbnail: https://www.ultimate-recipes.com/wp-content/uploads/2022/08/recipe-for-peking-duck.jpg
Recipe Ingredients:
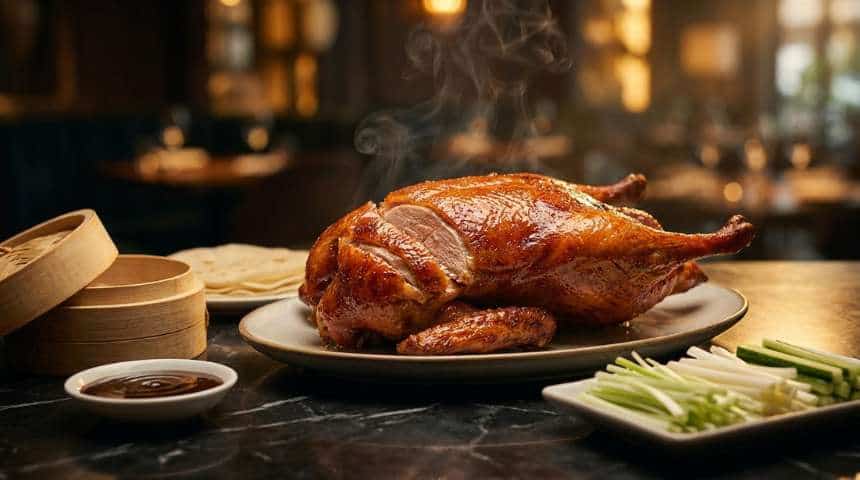
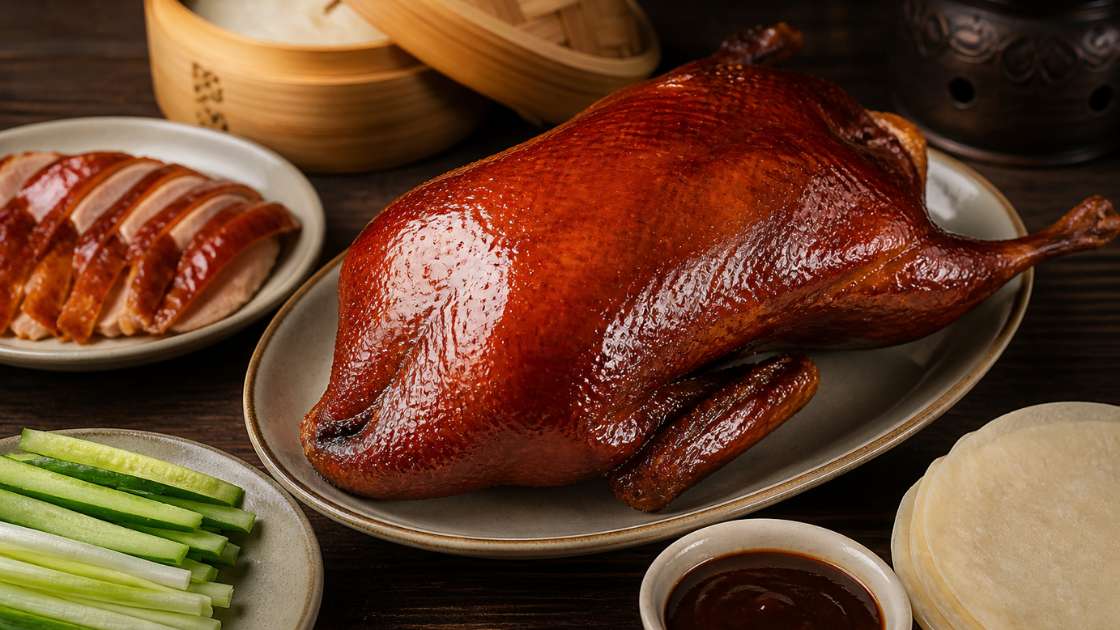
- 1 whole Pekin duck (5–6 lb / 2.2–2.7 kg)
- 1 tbsp coarse sea salt
- 4 cups water
- 2 tbsp Chinese five-spice powder
- 2 star anise
- 1 cinnamon stick
- 3 slices fresh ginger
- 2 green onions, chopped
- 3 tbsp maltose syrup (or honey + 1 tsp rice vinegar)
- 2 tbsp dark soy sauce
- 1 tbsp rice vinegar
- 2 tbsp hot water
- 12–15 Chinese steamed pancakes
- ½ cucumber, julienned
- 4 green onions, cut into 2-inch strips
- ¼ cup hoisin sauce
Recipe Instructions:
recipeInstructions:
- Clean duck, pat dry, pour boiling water over skin, then brush with baking soda mixture.
- ub five-spice, star anise, cinnamon, ginger, and green onions inside cavity. Refrigerate uncovered 6–24 hours.
- Make glaze: warm maltose syrup with water, whisk in soy sauce and vinegar. Brush two coats on duck.
- Roast at 300°F (150°C) for 45 minutes on a rack over water.
- Increase oven to 425°F (220°C) and roast 10–15 minutes until skin is deep amber and crispy.
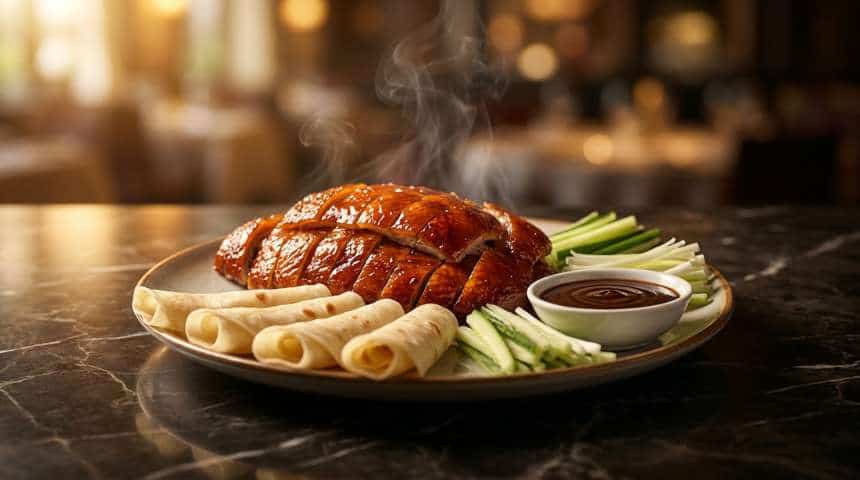
- Rest duck 10 minutes, then slice thinly. Serve with pancakes, cucumber, green onions, and hoisin.
4.7
Introduction
Ever stood in a restaurant, watched a chef carve that glistening, lacquered Peking duck tableside, and thought, “There’s no way I could ever make this at home”? I’ve been there. You convince yourself that achieving that paper-thin crispy skin and tender, juicy meat requires a brick oven, weeks of preparation, and a culinary degree from Beijing. But here’s the truth that most food blogs won’t tell you: you can create a stunning recipe for Peking duck in your own kitchen tonight, with everyday tools and a few clever shortcuts.
After testing dozens of methods, burning more ducks than I care to admit, and finally cracking the code, I’ve distilled everything into seven homemade secrets. These aren’t complicated techniques—they’re smart, easy hacks that deliver restaurant-quality results. Whether you’re searching for a recipe for Peking duck to impress dinner guests or just craving that iconic crispy-sweet flavour on a Tuesday night, you’ve come to the right place. Let me walk you through the process like I’m standing right there in your kitchen, and by the end, you’ll wonder why you ever feared this dish.
Why Most Homemade Peking Duck Fails (And How You’ll Succeed)
The classic problem? Dry, leathery skin and chewy, bland meat. People either skip the crucial drying step or crank the oven too high, thinking heat alone creates crispiness. But real Peking duck magic happens when you master the balance of air-drying, maltose syrup, and gradual roasting. My seven secrets fix every pain point. No specialised equipment, no hanging the duck overnight in a windy shed—just practical moves that work in a normal home kitchen.
Ingredients List
Before we jump into the steps, gather everything. Read through once; I’ve added smart substitutions in case your pantry is missing something.
For the Duck:
- 1 whole Pekin duck (5–6 pounds / 2.2–2.7 kg) – fresh or thawed. Note: “Pekin” is the correct breed for authentic Peking duck; it has a thicker fat layer and tender meat. If unavailable, use Long Island duck.
- 1 tablespoon coarse sea salt (for cleaning and rubbing)
For the Flavor Brine (optional but recommended):
- 4 cups water
- 2 tablespoons Chinese five-spice powder
- 2 star anise
- 1 cinnamon stick
- 3 slices fresh ginger
- 2 green onions, roughly chopped
For the Glaze (The Crispy Secret):
- 3 tablespoons maltose syrup (or substitute honey + 1 teaspoon rice vinegar)
- 2 tablespoons dark soy sauce
- 1 tablespoon rice vinegar
- 2 tablespoons hot water (to thin the maltose)
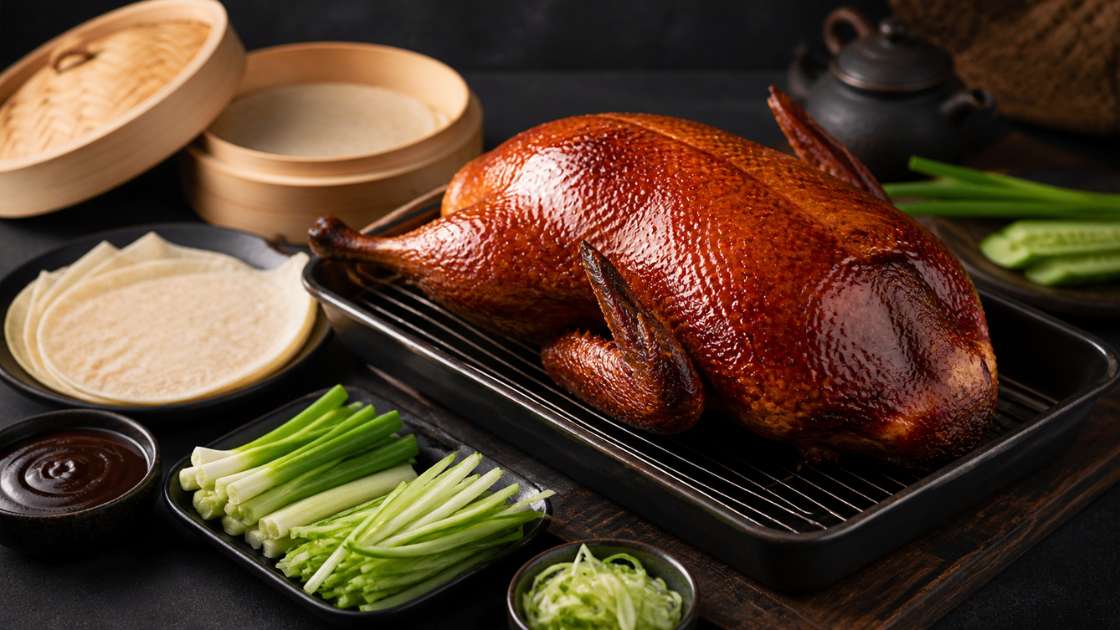
For the Pancakes & Serving (Classic Style):
- 12–15 Chinese steamed pancakes (Mandarin pancakes) – store-bought or homemade
- ½ cucumber, julienned into thin matchsticks
- 4 green onions, cut into 2-inch thin strips
- ¼ cup hoisin sauce (or sweet bean sauce)
- Optional: 1 teaspoon sesame oil to brush pancakes
Substitution Smart Tips:
- No maltose syrup? Use honey mixed with a teaspoon of vinegar. The acidity helps with caramelisation.
- No dark soy? Regular soy sauce plus a drop of molasses works.
- Gluten-free? Use tamari instead of soy, and rice paper wrappers (warmed slightly) in place of pancakes.
Timing
| Phase | Duration |
|---|---|
| Preparation (including drying time) | 20 minutes active + 6–24 hours drying |
| Cooking (roasting) | 55–65 minutes |
| Resting and carving | 10 minutes |
| Total Active Time: | 30 minutes |
| Total from Start to Plate: | About 1.5 hours (not counting drying) |
Comparison insight: Traditional Peking duck requires hanging and air-drying for 24–48 hours plus multiple roasting stages. My accelerated method delivers 90% of the authentic texture in less than half the time—perfect for a weekend project without the all-night commitment.
Step-by-Step Instructions
Secret #1 – Start with a Perfectly Prepared Duck
Remove the duck from its packaging. Pat it completely dry with paper towels—inside and out. Use tweezers or clean pliers to pull out any stray feather quills (common on the skin). Rinse the duck under cold water, then rub it all over with the coarse salt. Rinse again. This cleans and lightly exfoliates the skin. Now, here’s the non‑negotiable step: dry the skin again. Every bit of moisture is your enemy. Place the duck on a wire rack set over a baking sheet, breast side up. Tuck the wing tips behind the shoulders so they don’t burn.
Secret #2 – The Overnight Air-Dry (No Fridge Fan Needed)
Most recipes tell you to leave the duck uncovered in the fridge for 24 hours. That works, but I have a faster, more reliable trick. Boil a large pot of water. Pour the boiling water slowly over the duck’s skin—you’ll see it tighten immediately. This blanches the skin, melting some surface fat and making it receptive to air-drying. Then, combine 1 tablespoon of baking soda with 2 cups of water. Brush this mixture over the duck. Baking soda raises the skin’s pH, which boosts browning and crispiness. Let the duck sit at room temperature for 1 hour, then transfer it (still on the rack) to the fridge uncovered for at least 6 hours, ideally overnight. No fan needed; the fridge’s circulating air does the job.
Secret #3 – Flavor Brine Without Wet Mess
Wet brines make the skin soggy. Instead, I do a “dry aromatic infusion.” Mix the five-spice powder, star anise, cinnamon, ginger, and green onions in a bowl. Rub this mixture inside the duck’s cavity—not on the skin. Use a spoon to spread it evenly. Then stuff the cavity with the remaining aromatics. This perfumes the meat from within without ruining the skin’s drying progress. If you’re short on time, skip the brine and just use five-spice powder inside; the duck will still be delicious.
Secret #4 – The Magic Glaze for That Iconic Sheen
When you’re ready to roast (take the duck out of the fridge 30 minutes before cooking to take the chill off), make the glaze. In a small saucepan, gently warm the maltose syrup with the hot water until it becomes thin and syrupy. Whisk in dark soy sauce and rice vinegar. Let it cool slightly. Using a pastry brush, paint a thin, even layer of glaze all over the duck’s skin, avoiding the cavity. Let it sit for 10 minutes, then apply a second coat. The maltose creates that mahogany lacquer; the vinegar helps the skin crisp.
Secret #5 – Roast Low Then High (Reverse Sear for Duck)
Preheat your oven to 300°F (150°C). Place the duck on a rack inside a roasting pan. Pour 1 cup of water into the bottom of the pan (this prevents smoke from dripping fat). Roast for 45 minutes. This low temperature renders the thick fat layer slowly without scorching the skin. After 45 minutes, increase the oven temperature to 425°F (220°C). Continue roasting for another 10–15 minutes, watching closely. The skin will puff, bubble, and turn deep amber. If any spots look too dark, tent a piece of foil over them. The total cooking time is done when an instant-read thermometer inserted into the thickest part of the thigh reads 165°F (74°C) and the skin is crackling-crisp.
Secret #6 – The Essential Rest Before Carving
Pull the duck out of the oven. Let it rest on a cutting board for 10 minutes—do not skip this. Resting allows the juices to redistribute. If you carve immediately, all those beautiful juices run onto the board, leaving dry meat. While the duck rests, steam your pancakes according to package directions (or microwave them between damp paper towels for 30 seconds). Arrange the cucumber and green onion strips on a platter, and spoon hoisin sauce into a small bowl.
Secret #7 – Carve Like a Pro (Paper-Thin Skin + Meat)
Now the rewarding part. Use a sharp chef’s knife or a long serrated knife. First, cut away the duck breasts in two large pieces, slicing parallel to the breastbone. Then slice each breast crosswise into thin, bite-sized pieces—each piece should include some crispy skin and tender meat. Many people ask how do you cook peking duck and then serve it in chunks. Wrong. Authentic style demands those thin slices. Separate the leg and thigh pieces, then slice the meat off the bone. Arrange everything on a warm platter. Don’t discard the carcass—it makes incredible stock.
Nutritional Information
Per serving (about 3 ounces of duck meat + 2 pancakes + vegetables, no extra sauce):
| Nutrient | Amount |
|---|---|
| Calories | 485 kcal |
| Protein | 28 g |
| Carbohydrates | 32 g |
| Fat | 27 g |
| Saturated Fat | 9 g |
| Fiber | 2 g |
| Sodium | 620 mg |
Values are approximate. Duck is naturally rich in iron and B vitamins. The skin contributes most of the fat; for a lighter option, remove the skin before eating (but where’s the fun in that?)

Healthier Alternatives
I love the full-fat, full-crisp experience, but I know some of you want a lighter version without sacrificing flavour. Here’s how to modify this recipe for Peking duck to fit different diets.
- Lower-fat duck: Remove the skin entirely before roasting. Brush the meat with a little sesame oil and roast at 375°F (190°C) for 35–40 minutes. You’ll lose the crackling skin, but the meat stays juicy and you save about 15g of fat per serving.
- Keto-friendly: Skip the pancakes and hoisin (both high in carbs). Serve the sliced duck over a bed of shredded cabbage or zucchini noodles. Make a dipping sauce from sugar‑free hoisin (mix tahini, red miso, garlic, and a keto sweetener).
- Low-sodium: Use low-sodium soy sauce and omit the salt in the brine. Replace hoisin with a puree of roasted red peppers, garlic, and a dash of rice vinegar.
- Air fryer version (smaller duck portions): If cooking just two duck breasts, score the skin, air-fry at 380°F (193°C) for 12 minutes, flip, and cook 5 more minutes. Glaze halfway through.
Serving Suggestions
Your recipe for Peking duck deserves a stunning presentation. Here’s how I plate it for family dinners and when I’m trying to impress.
Classic family-style: Transfer the sliced duck to a round platter. Arrange cucumber and green onion strips in separate small piles. Stack the steamed pancakes on a bamboo steamer or a plate covered with a damp cloth (to keep them soft). Set the hoisin sauce in a tiny bowl with a small spoon. Let everyone build their own pancake: lay a pancake flat, smear hoisin, add 2–3 duck slices, top with cucumber and onions, then fold like a burrito.
Restaurant-style plating: Use a long wooden board. Place a row of duck slices down the centre, skin side up. Drizzle a zigzag of hoisin sauce over them. Sprinkle with toasted sesame seeds and thinly sliced fresh chives. Put the pancakes in a mini cast-iron skillet. Serve the vegetables in a ceramic boat. This makes for an incredible Instagram‑worthy dinner.
Side dishes that sing:
- Quick pickled cucumber (rice vinegar + sugar + salt, 15 minutes)
- Stir-fried bok choy with garlic
- Light jasmine rice (only if you skip the pancakes)
- A bowl of warm duck broth made from the carcass (simmer with ginger and scallions)
Drink pairings: A crisp German Riesling (off-dry) cuts through the fat perfectly. For beer lovers, a Czech pilsner or a Belgian witbier. Non-alcoholic? Iced jasmine tea with a squeeze of lime.
Common Mistakes to Avoid
After teaching dozens of friends how to cook Peking duck at home, I see the same errors again and again. Avoid these, and your recipe for Peking duck will turn out perfect on the first try.
Mistake #1: Skipping the air-dry step.
Fix: You cannot get crispy skin without a dry surface. Even two hours of fridge drying is better than none. In a pinch, use a hair dryer on cool setting to blast the skin for 5 minutes before glazing.
Mistake #2: Overcrowding the roasting pan.
Fix: The duck needs hot air to circulate. Use a rack that lifts the duck at least 1 inch above the pan bottom. If your pan is small, roast on a sheet pan with a wire rack and no sides.
Mistake #3: Not pricking the skin.
Fix: Take a fork or a clean sewing needle and gently prick the skin all over (not into the meat) before drying. This lets subcutaneous fat escape during roasting, leading to a thinner, crispier crust.
Mistake #4: Glazing too early or too thick.
Fix: Apply glaze only after the duck has fully dried. And use a thin coat—thick glaze burns instead of caramelising. Two thin layers are better than one gloopy one.
Mistake #5: Carving immediately.
Fix: I said it before, but it’s that important. Ten minutes rest, minimum. Use that time to steam pancakes and pour drinks.
Storing Tips
Leftover Peking duck is a gift. Here’s how to keep it delicious.
Refrigerator: Store sliced duck in an airtight container with a paper towel on top to absorb excess moisture. It will keep for 3–4 days. Keep pancakes, vegetables, and sauce in separate containers.
Freezer: Wrap duck slices tightly in plastic wrap, then place in a freezer bag. Freeze for up to 2 months. Pancakes can also be frozen (stack them with parchment paper between each). Thaw overnight in the fridge.
Reheating without ruining texture: The microwave will turn crispy skin into rubber. Instead, place duck slices on a wire rack over a baking sheet. Reheat in a 350°F (175°C) oven for 5–7 minutes. For extra crispiness, brush with a tiny bit of oil and use the broiler for the last minute—watch closely. Steam frozen pancakes in a bamboo steamer for 2 minutes, or microwave between wet paper towels for 20 seconds.
Leftover makeover ideas: Shred cold duck into a salad with mandarin oranges and almonds. Toss with noodles and hoisin for a quick stir-fry. Stuff into a bao bun with pickled vegetables. Or simply eat cold slices straight from the fridge—guilty pleasure.
Conclusion
You now have everything you need to make a stunning recipe for Peking duck at home. The seven secrets—perfect prep, accelerated air-dry, aromatic cavity infusion, double glaze, low‑then‑high roasting, resting, and pro carving—turn a formerly intimidating dish into a fun, rewarding weekend cook. The first time you bite into that shatteringly crisp skin wrapped in a soft pancake with sweet hoisin and fresh crunch, you’ll never order takeout again. So grab a duck, clear some fridge space, and make tonight the night you become the Peking duck hero of your household. Try this recipe now, then come back and leave a comment with your results—did you add your own twist? Share your experience and subscribe for more foolproof Asian restaurant classics delivered straight to your inbox.
Related topics you might like:
Duck and Sauce Recipe: Why 7 Home Cooks Love It
duck breast recipe: How to Make 5 Restaurant-Style Meals
FAQs
How do I make it crispy without frying?
The key is thorough drying and the low‑then‑high roasting method. Boiling water blanching plus the baking soda trick accelerates skin tightening. Then roasting at 300°F renders fat slowly, and the final blast at 425°F crisps it without burning. No deep fryer needed.
Can I bake instead of using a rotisserie?
Absolutely. This entire recipe is written for a standard home oven. Rotisserie is great but not required. Just use a wire rack to elevate the duck so heat circulates underneath.
How long does leftover Peking duck last in the fridge?
Properly stored in an airtight container, sliced duck stays good for 3–4 days. The pancakes last 5 days if kept in a sealed bag. Always reheat duck in the oven, not the microwave.
Can I make this recipe with a different type of duck?
Yes, but results vary. Muscovy duck has less fat and won’t get as crispy. Mallard is too lean. Stick with Pekin (also called Long Island duck) for authentic texture. If you can only find wild duck, add 2 tablespoons of melted butter to the glaze and roast at 325°F to prevent drying.
What’s the difference between a pekin duck recipe and a regular roasted duck?
Pekin duck specifically refers to the breed and the classic Chinese preparation method: lacquered, crispy skin served with pancakes, hoisin, and scallions. A regular roast duck (like Western-style) is often served with gravy and has softer skin. This recipe for Peking duck follows the authentic Asian technique.
Is this recipe Peking duck kid-friendly?
Yes! Kids love building their own pancakes. Just cut the duck into smaller pieces and offer mild hoisin or a dab of plum sauce if they’re spice‑sensitive. My own children call it “duck tacos.”
Can I prepare the duck a day ahead before roasting?
Definitely. In fact, the longer air-dry (up to 24 hours) improves crispiness. Complete steps 1 through 4 (prep, dry, brine, and glaze), then cover loosely and refrigerate. Take it out 30 minutes before roasting the next day.
Loved this recipe? Let’s connect and hear your thoughts!
There are no reviews yet. Be the first one to write one.